Introduction
The purpose of this Developer Guide is to provide useful information to software developers who desire to contribute to the project (e.g. optimizing of code, adding test cases, etc.), including an overview of the software architecture, design as well as current implementations and intended functionality of current features. The police database is for police officers(PO) and headquarters personnel(HQP). Both groups will have varying access and authorization levels to this database. POs would be able to read from the database after screening someone while on patrol and choose his course of action base on the status/threat level of subject. HQP would have the added functions of adding and removing people from the database. Refer to quick start to get started.
Setting up
To set up the project successfully on your computer, follow the steps below.
Prerequisites
In order to start the setup, you are required to install the following:
-
JDK 9 or later
-
IntelliJ IDE
Importing the project into IntelliJ
-
Open IntelliJ (if you are not in the welcome screen, click
File>Close Projectto close the existing project dialog first) -
Set up the correct JDK version
-
Click
Configure>Project Defaults>Project Structure -
If JDK 9 is listed in the drop down, select it. If it is not, click
New…and select the directory where you installed JDK 9 -
Click
OK
-
-
Click
Import Project -
Locate the
build.gradlefile and select it. ClickOK -
Click
Open as Project -
Click
OKto accept the default settings -
Run the
seedu.addressbook.Mainclass (right-click theMainclass and clickRun Main.main()) and try executing a few commands -
Run all the tests (right-click the
testfolder, and clickRun 'All Tests') and ensure that they pass -
Open the
StorageFilefile and check for any code errors-
Due to an ongoing issue with some of the newer versions of IntelliJ, code errors may be detected even if the project can be built and run successfully
-
To resolve this, place your cursor over any of the code section highlighted in red. Press ALT+ENTER, and select
Add '--add-modules=java.xml.bind' to module compiler options
-
Configurations to do before writing code
Configuring the coding style
This project follows oss-generic coding standards. IntelliJ’s default style is mostly compliant with ours but it uses a different import order from ours. To rectify,
-
Go to
File>Settings…(Windows/Linux), orIntelliJ IDEA>Preferences…(macOS) -
Select
Editor>Code Style>Java -
Click on the
Importstab to set the order-
For
Class count to use import with '*'andNames count to use static import with '*': Set to999to prevent IntelliJ from contracting the import statements -
For
Import Layout: The order isimport static all other imports,import java.*,import javax.*,import org.*,import com.*,import all other imports. Add a<blank line>between eachimport
-
Optionally, you can follow the UsingCheckstyle.adoc document to configure Intellij to check style-compliance as you write code.
Updating documentation to match your fork
After forking the repo, the documentation will still have the SE-EDU branding and refer to the se-edu/addressbook-level3 repo.
If you plan to develop this fork as a separate product (i.e. instead of contributing to se-edu/addressbook-level3), you should do the following:
-
Configure the site-wide documentation settings in
build.gradle, such as thesite-name, to suit your own project. -
Replace the URL in the attribute
repoURLinDeveloperGuide.adocandUserGuide.adocwith the URL of your fork.
Setting up CI
Set up Travis to perform Continuous Integration (CI) for your fork. See UsingTravis.adoc to learn how to set it up.
Design
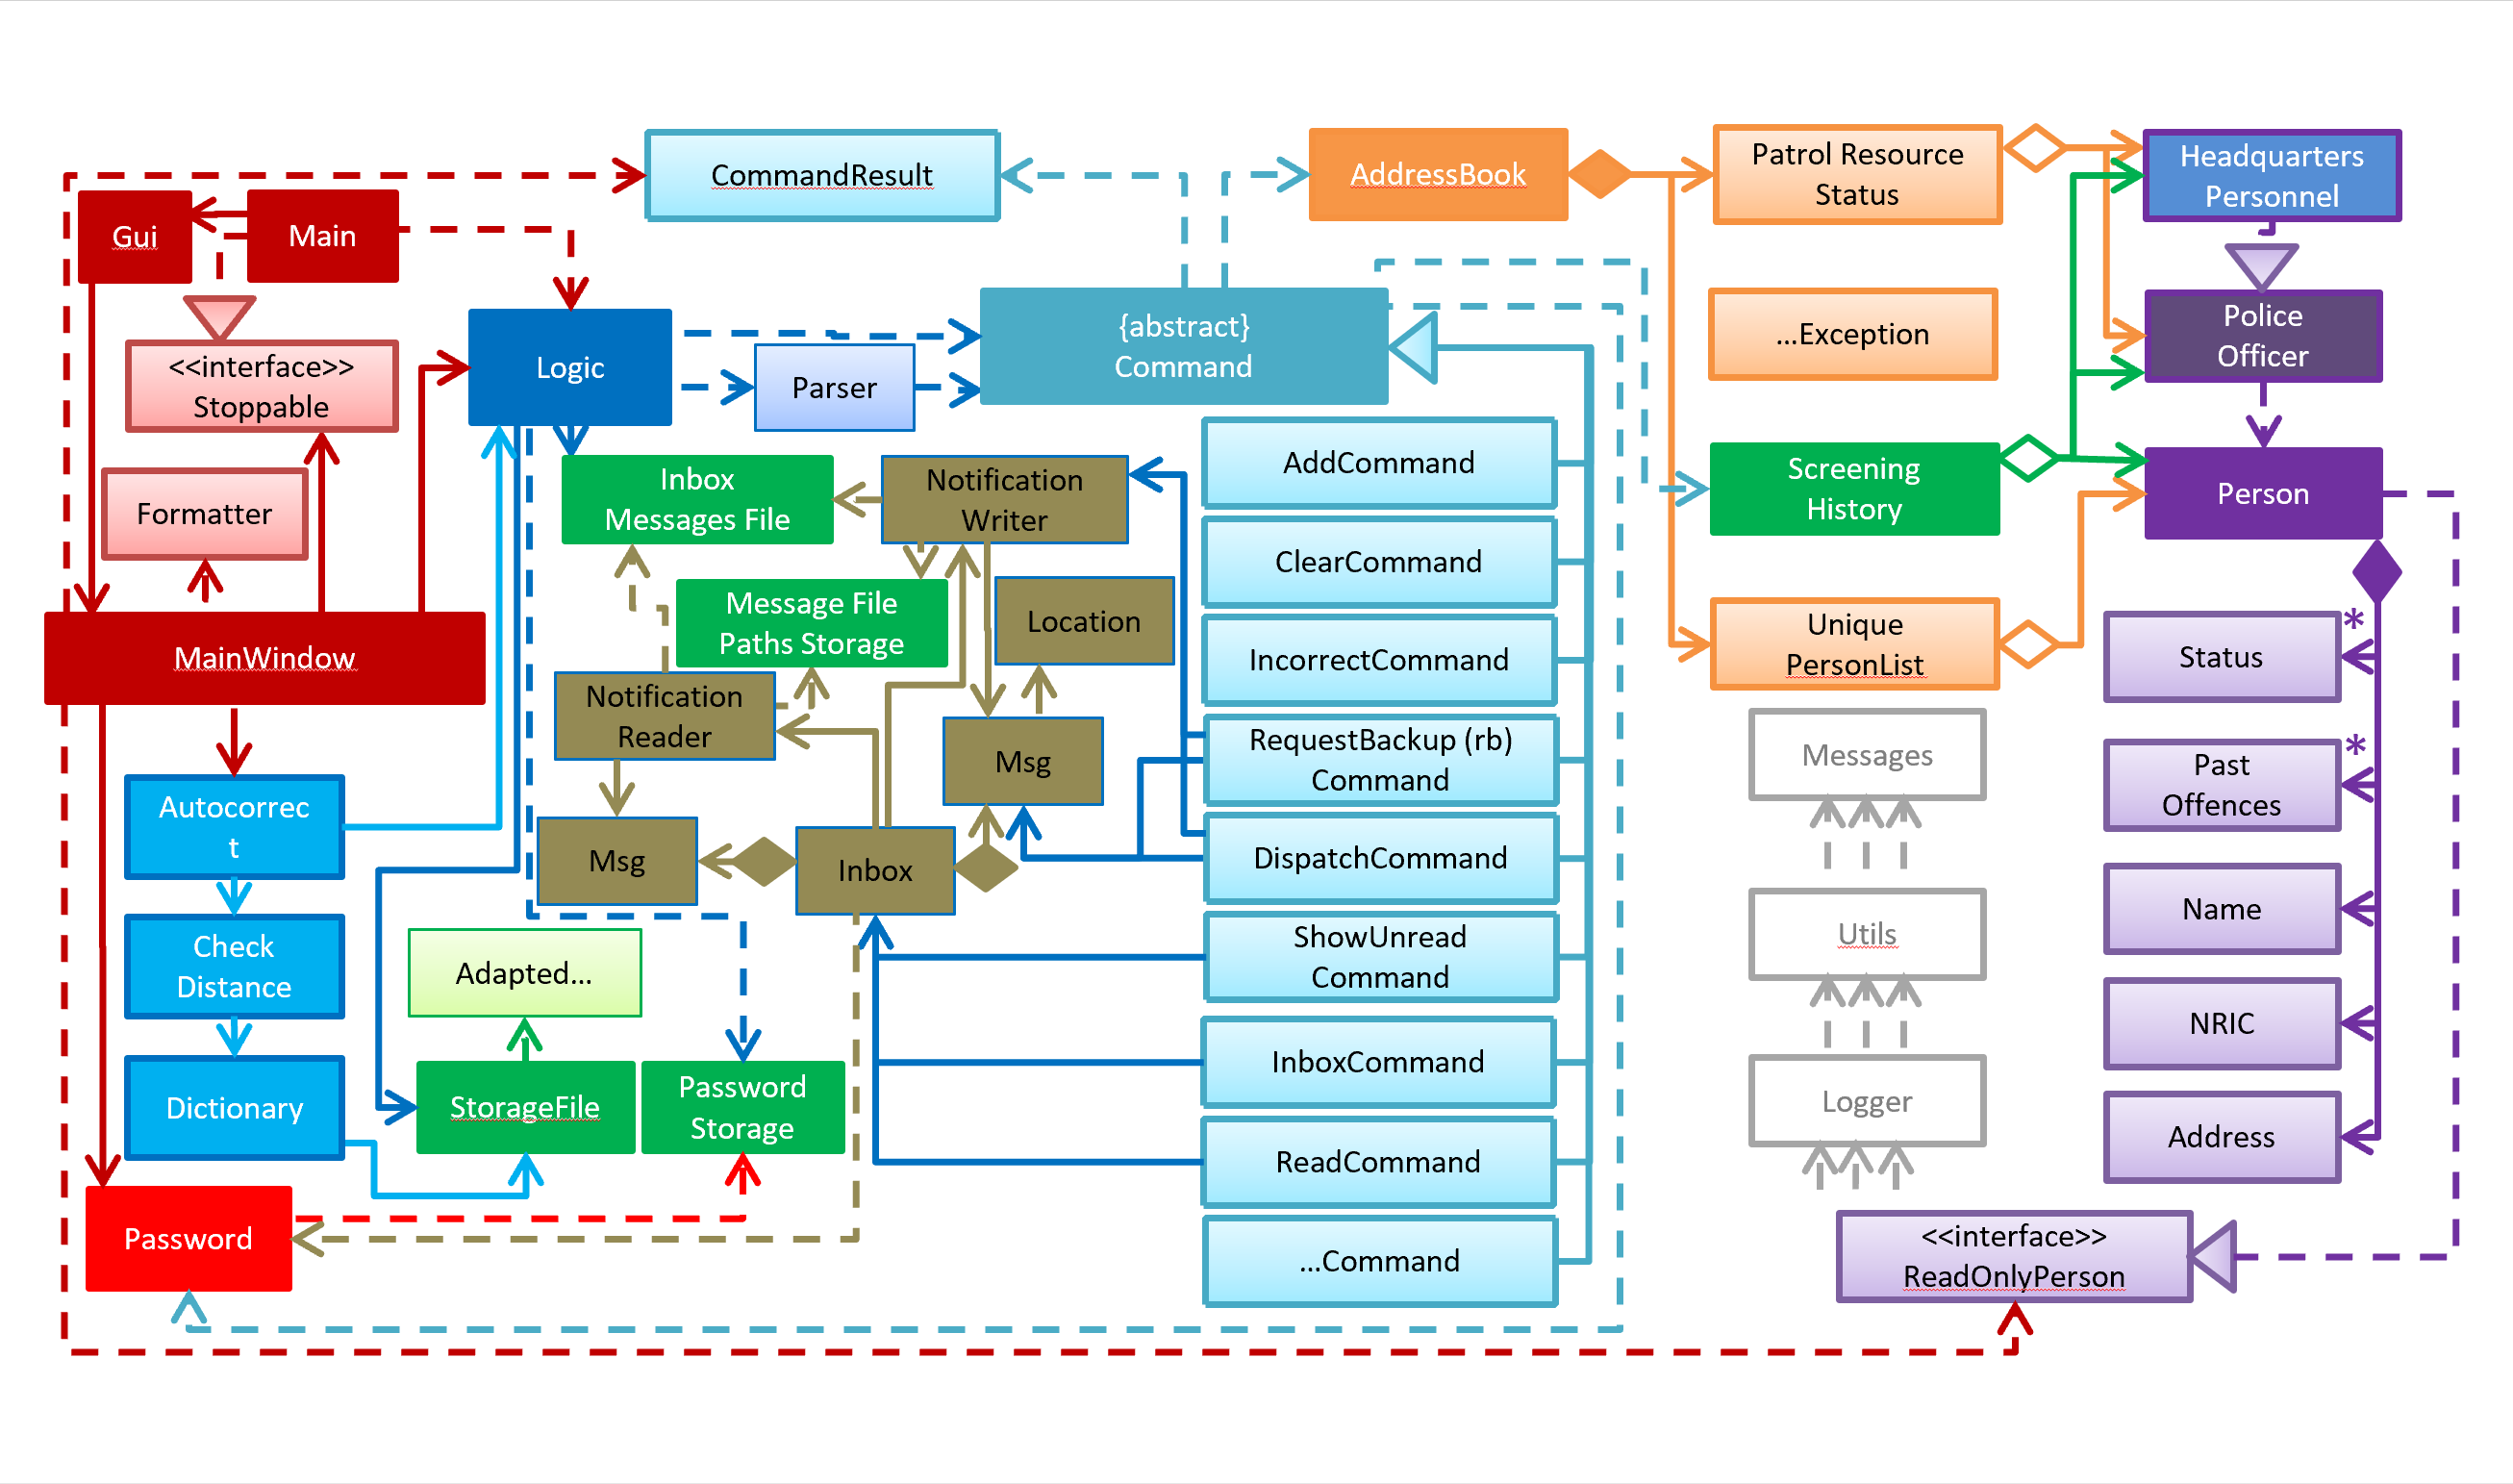
The diagram below shows a high level architecture design of the current classes that are used in the project.
Implementation
This section describes some of the more important details of certain features implemented.
1a. Password feature
Current Implementation
This feature provides different access levels of commands to the user, depending on the password entered.
-
unlockDevice() - attempts to match a hashcoded user input with an existing password in the passwordStorage.txt file.
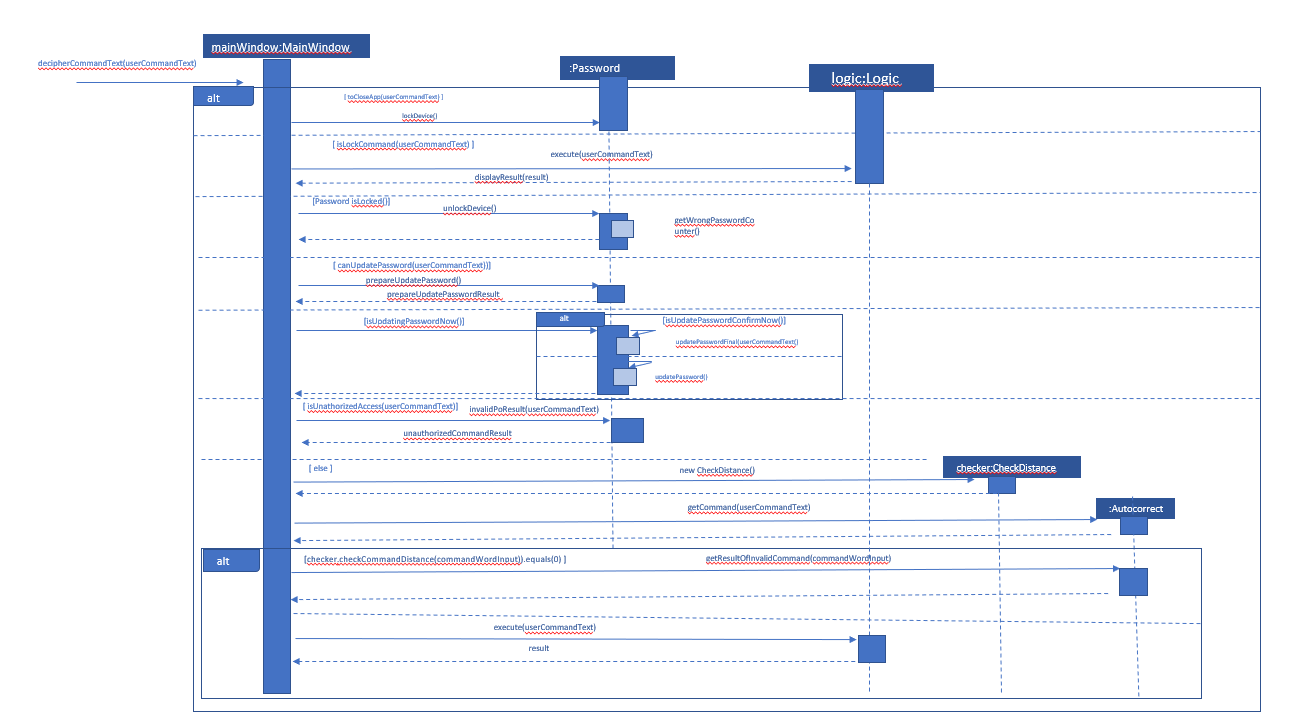
The following is an example usage scenario of the password feature.
Step 1: User enters password for HQP.
Step 2: decipherUserCommandText() in MainWindow class identifies command as a password input, through the use of isLocked() method in the Password class.
Step 3: unlockDevice() in Password class is called.
Step 4: The user input, userCommandText, is then hashcoded using userCommandText.hashCode().
Step 5: Using a Buffered reader from the ReaderAndWriter class, a loop through passwordStorage.txt tries to match the hashcoded input with an existing password.
Step 6: The user and password are stored in passwordStorage.txt in this format : "userID (hashcoded)password".
Step 7: When matched, the userID is returned and a welcome message is displayed for the particular user.
Design Considerations
Aspect: How password feature is implemented
-
Alternative 1 (current choice): Using a password with no need for username
-
Pros: Reduce user’s keyboard input
-
Cons: Slow buffered reader has to loop through all passwords in the text file
-
-
Alternative 2: Using username and password
-
Pros: Can use a hashmap for quick look up, with the userID as key and hashcoded password as the value
-
Cons: More input from user, and difficult to store in an external text file
-
1b. Update Password Feature

Current Implementation
This feature enables only HQP to update any existing password.
-
updatePassword() - user enters existing password to update.
-
updatePasswordFinal() - user enters new alphanumeric password to replace existing password.
The following is an example usage scenario of the update password feature.
Step 1: User enters password for HQP.
Step 2: User enters "update password" command.
Step 3: decipherUserCommandText() in MainWindow class identifies the command as "update password" and begins update password sequence.
Step 4: User enters password for HQP.
Step 5: Similar to the password feature, the process of the user input to match the existing HQP password maintains.
Step 6: User enters new 5-character long alphanumeric password.
Step 7: The new entered password runs through passwordValidityChecker() to check if the password is at least 5 characters long and at least alphanumeric. This password is stored as oneTimePassword String.
Step 8: The user enters the same new password. It matches with the oneTimePassword.
Step 9: The Buffered reader then reads reads through passwordStorage.txt, and a Print writer from the ReaderAndWriter class writes existing passwords to a temporary file, while writing the new password in place of the old password that has been requested to be updated.
Step 10: The temporary file is renamed to passwordStorage.txt and deleting the old passwordStorage.txt file.
Step 11: The System returns a message that update password is successful.
Design Considerations
Aspect: How update password feature is implemented
-
Alternative 1 (current choice): writing to a temporary file then renaming
-
Pros: No conflicts when writing to a new file
-
Cons: Space is required for the new file before deleting original file
-
-
Alternative 2: Overwriting current passwordStorage.txt file
-
Pros: Maintain space usage
-
Cons: Many errors when overwriting
-
2a. "find" command (edited)

Current Implementation
The new "find" command is revised from the existing "find" command in AB3. Instead of finding a person by name, it finds a person using his NRIC. It also implements the following operations:
-
execute() - executes the "find" command itself and displays the result to the user.
-
getPersonWithNric() - Searches the Police Records to retrieve the person with the specified NRIC.
The following is an example usage scenario of the "find" command:
Step 1: The user input his password and unlocks the system.
Step 2: The user executes "find s1234567a" command.
Step 3: Parser class determines the command word and runs prepareFind method.
Step 4: prepareFind determines string is a valid nric, then instantiates a new FindCommand.
Step 5: Logic class calls the execute() method on the FindCommand object.
Step 6: The getPersonWithNric() method called in execute() searches the Police Records for the person with "s1234567a" if he exists and person is stored in a list.
Step 7: The person is found and is stored in a matchedPerson list variable. execute() returns a CommandResult using the matchedPerson list as its argument.
Step 8: The CommandResult object displays to the user the searched person and his details, all of which in string form.
Design Considerations
Aspect: How find command is implemented
-
Alternative 1 (current choice): Finding using NRIC
-
Pros: Using nric to find people would be better as each person has a unique nric
-
Cons: Difficult to implement
-
-
Alternative 2: Finding by name
-
Pros: Use current implementation
-
Cons: There could be multiple people with the same name
-
2b. "check" command

Current Implementation
Only HQP may use this command. This command displays the timestamps of which a person with the specified NRIC was screened using the "find" command. The "check" command makes some use of the "find" command. Every time the "find" command successfully finds a person, a line in the format of: "NRIC timestamp" is printed in a text file called "screeningHistory.txt". The "check" command will read this file and retrieve the timestamps corresponding to the specified NRIC.
It also implements the following operations:
-
execute() - executes the "check" command itself and displays the result to the user.
-
getPersonWithNric() - Searches the Police Records to retrieve the person with the specified NRIC.
Below is an example of its usage:
Step 1: The user(a HQP) input his password and unlocks the system.
Step 2: The user executes "check s1234567a"
Step 3: Parser class determines the command word and runs prepareCheck method.
Step 4: prepareCheck determines string is a valid nric, then instantiates a new CheckCommand.
Step 5: Logic class calls the execute() method on the CheckCommand object.
Step 6: execute() also calls the getPersonWithNric() method. This method will read the screeningHistory.txt line by line, where each line is in the format of "NRIC timestamp", for example "s1234567a 18/10/2018-2038hrs by hqp". Each line is split into the NRIC and timestamp. If line[0] is the NRIC specified, the corresponding timestamp is stored in a list.
Step 7: The list from step 6 gets returned by execute() to create a CommandResult object which displays all the timestamps to the user.
Design Considerations
Aspect: How check command is implemented
-
Alternative 1 (current choice): All timestamps are stored in one file
-
Pros: Maintains space usage
-
Cons: Slow to retrieve timestamps as have to loop through whole file
-
-
Alternative 2: Having a text file for each person, stored in a 'persons' folder
-
Pros: Each timestamp would then be stored in the respective text file, Retrieving timestamps would be much more efficient
-
Cons: Space complexity would increase especially if the number of persons increased drastically
-
2c. "edit" command

Current Implementation
Only a HQP may use this command. This command allows HQP to update their chosen parameters which include the status, offense, postal code and wanted attributes of a specific NRIC. It is similar to the "find" command in the sense that it searches for the person in the Police Records list by NRIC. At least one parameter must be updated. Offenses are added not replaced.
It also implements these methods:
-
execute() - executes the "edit" command itself and displays result to user
This is an example scenario of "edit" command
Step 1: The user inputs HQP password and logs in as HQP.
Step 2: The user types "edit n/s1234567a p/510247 s/wanted w/murder o/gun" and executes it.
Step 3: Parser class determines the command word and runs the prepareEdit method
Step 4: prepareEdit method in Parser class would parse each non-empty input such as NRIC, Postal Code, Status, Wanted & Offense from the input text to instantiate the EditCommand class.
Step 5: Logic class then calls the execute method on EditCommand Object. Person with NRIC "s1234567a" is searched for in the Police Records. If he/she exists, then the person’s attributes get updated accordingly.
Step 6: CommandResult with successful message is returned to Logic class, which then displays to user: "Edited person: s1234567a".
Design Considerations
Aspect: How edit command is implemented
-
Alternative 1 (current choice): Can set attributes for read-only person
-
Pros: Editable persons
-
Cons: Should ot edit read only person
-
-
Alternative 2: Maintain person as read-only
-
Pros: Attributes are protected
-
Cons: Cannot edit persons easily
-
2d. "delete" command
Current Implementation
Only a HQP may use this command. A person’s data is allowed to be deleted from the Police Records. It also implements the following methods:
-
execute() - executes the "delete" command itself and displays the success or error message to the user
-
resultDeletePrediction() - In the event that the user inputs an NRIC that does not exists, this method will check the Police Records and try to return any person with a similar NRIC to what was given by the user
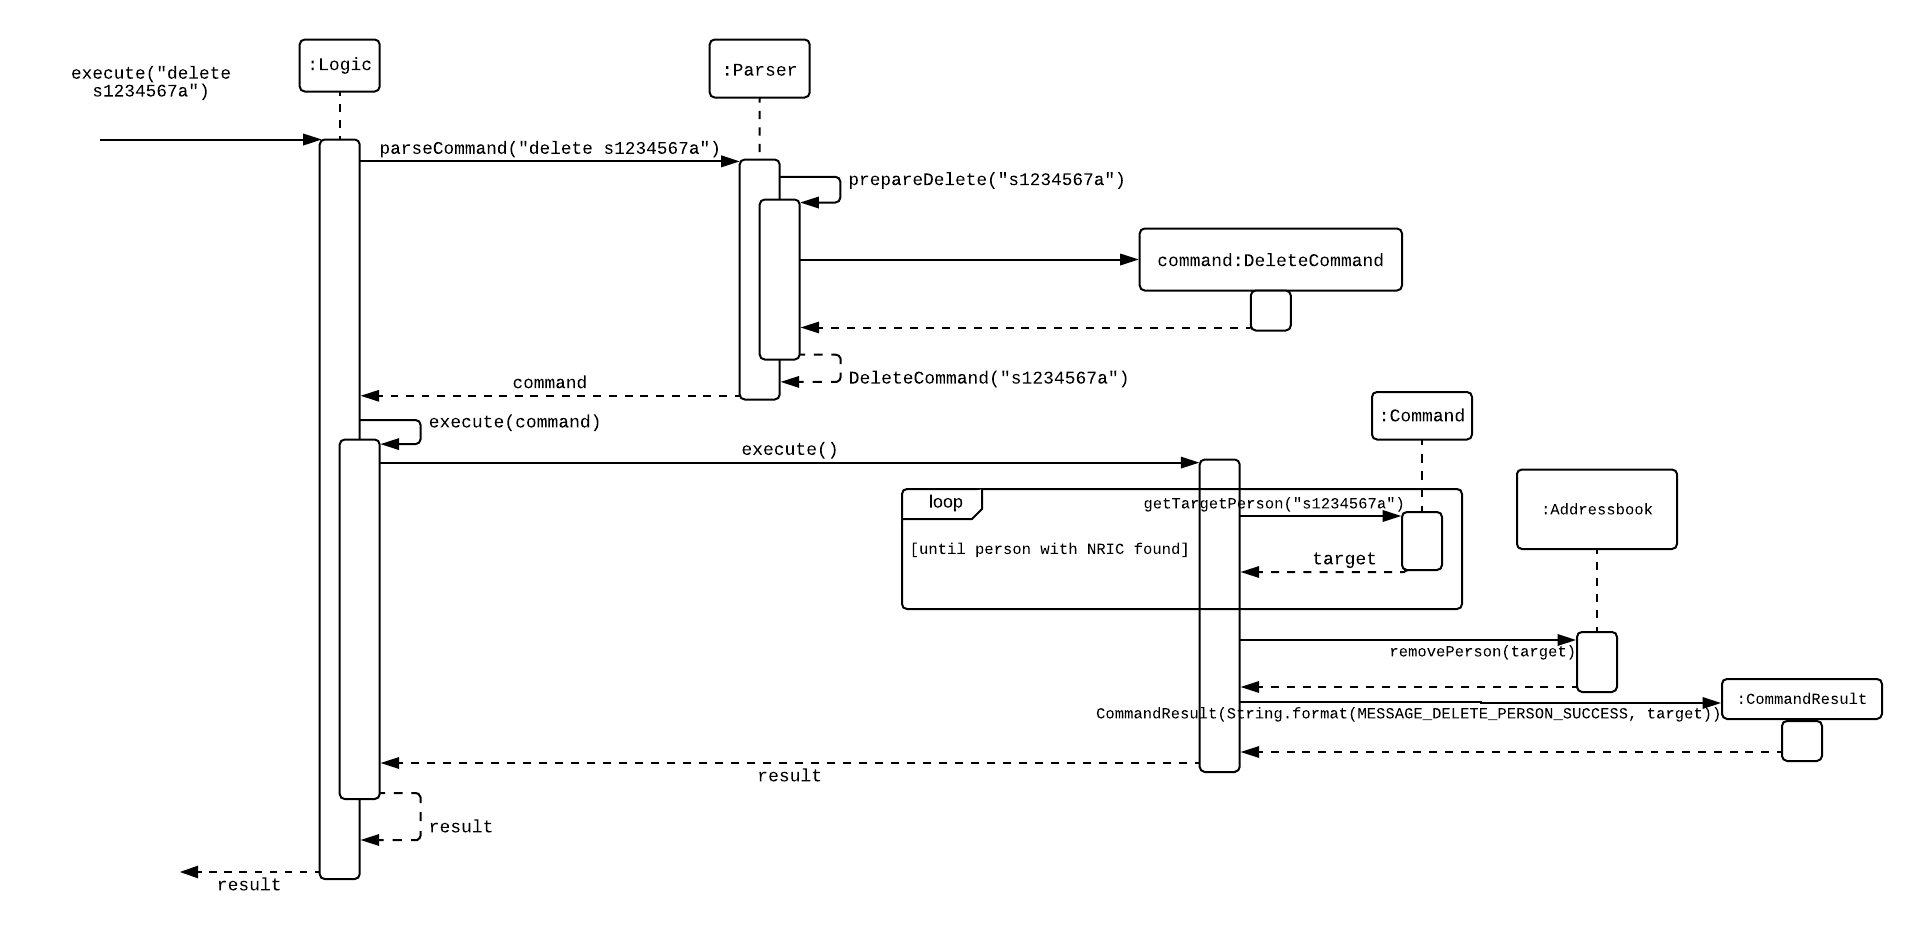
The following is an example usage scenario of the "delete" command:
Step 1: The user(a HQP) input his password and unlocks the system.
Step 2: The user executes "delete s1234567a"
Step 3: Parser class determines the command word and runs prepareDelete method.
Step 4: prepareDelete determines string is a valid nric, then instantiates a new DeleteCommand.
Step 5: Logic class calls the execute() method on the DeleteCommand object.
Step 6: In execute(), the Police Records will be iterated through to see if the person with the said NRIC exists. If not, resultDeletePrediction() will be called to check if any person has an NRIC close to the input.
Step 7: Once the person is deleted, a success message will be displayed to the user using a CommandResult object, else it would be an error message stating the person with said NRIC does not exist
Alternatives considered:
-
Delete by name parameter
-
Pros: Much more readable to user to delete a name than an NRIC
-
Cons: There can be more than 1 person with the same name, so deleting should use a more unique parameter
-
3a. "showunread" command

Current Implementation
Once system is unlocked, regardless of which user you are, you can use this command. This command lists the new/unread messages in your inbox based on the password you used to unlock the system. When messages are sent, they are stored inside a text file called "inboxMessages/'userID'", where 'userID' refers to the ID of the intended recipient. These text files store messages directed to each individual who can log in and access their personalised inbox. It also implements the following operations:
-
execute() - executes the "showunread" command itself and displays the result to the user.
-
loadMessages() - Searches the text file storing messages for the specific police officer identified by the userID and loads it into a data structure, sorting the messages according to how urgent they should be attended to (sorted first by read status, followed by priority and then the time the message was sent).
-
concatenateMsg() - Loaded messages are then concatenated in a single string as
fullPrintedMessageand passed to the main window through CommandResult.
The following is an example usage scenario of the "showunread" command:
Step 1: The user input his password and unlocks the system.
Step 2: The user executes "showunread" command. The "showunread" command calls execute() which also calls getMessagesFor() method.
Step 3: The loadMessages() method searches message storage file for the messages directed to the respective user, if any, and they are stored into a data structure.
Step 4: The messages that are found and are stored in a TreeSet, split by its read status, message priority, timestamp, and the message itself for sorting purposes.
Step 5: The concatenateMsg() method will then append all unread messages in sorted order to a string to be passed to the CommandResult object later.
Step 6: execute() returns a CommandResult using the concatenated string as its argument.
Step 7: The CommandResult object displays to the user the number of unread messages he has, and the list of unread messages sorted according to their urgency.
Design Considerations
Aspect: How showunread command is implemented
-
Alternative 1 (current choice): Using a TreeSet
-
Pros: Auto-sorts by read-status, priority then timestamp
-
Cons: Difficult to implement
-
-
Alternative 2: Using a List
-
Pros: Smaller time complexity
-
Cons: Does not auto-sort
-
3b. "inbox" command
Current Implementation Inbox command has the same implementation as the "showunread" command - except that it shows you all the messages that are in your inbox (both read and unread). This is to allow you to access the messages that you have previously marked as read.
3c. "read" command
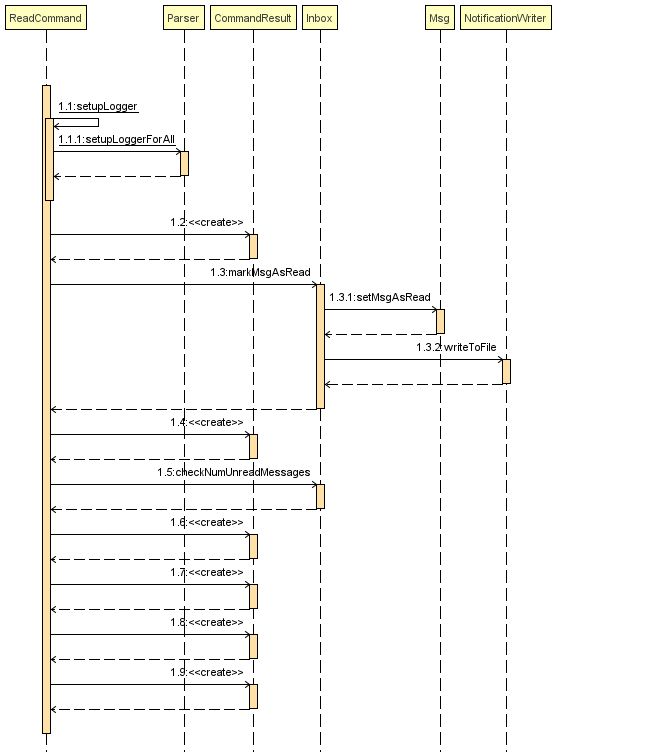
Current Implementation
Once the system is unlocked, you can access unread messages directed to you via the "showunread" command explained above. Once action has been taken based on what the message sent to you is about, you can mark the message as read using the "read" command. Messages displayd in "showunread" command is first stored inside a static HashMap, with the key as the message index and the message itself as the value of the HashMap. When the user wishes to mark a message as read, he will type "read 'index'", and the respective message displayed at that specific index will be marked as read and updated in the message storage file of the user. The "read" command can only be used after the "showunread" command has been used at least once successfully.
The following is an example usage scenario of the "read" command:
Step 1: User inputs his password and unlocks the system.
Step 2: User executes "showunread" OR "inbox" command. If command is successfully executed, a list of unread messages directed to the user will be displayed.
Step 3: Messages that are read from the user’s inbox will also be recorded in a static HashMap called recordNotifications, with the message index used as the key.
Step 4: User executes "read 3" command. If 3 is a valid index (i.e. there were at least 3 unread messages that were displayed), the third message displayed will be marked as read.
Step 5: For the messages to be marked as read, the message itself is updated in the HashMap based on the index, and the message storage text file will be overwritten with the messages stored in the HashMap, effectively updating the read status of the message read.
Step 6: The CommandResult object displays to the user a message indicating that the updating of the read status was successful or not.
3d. "clearinbox" command
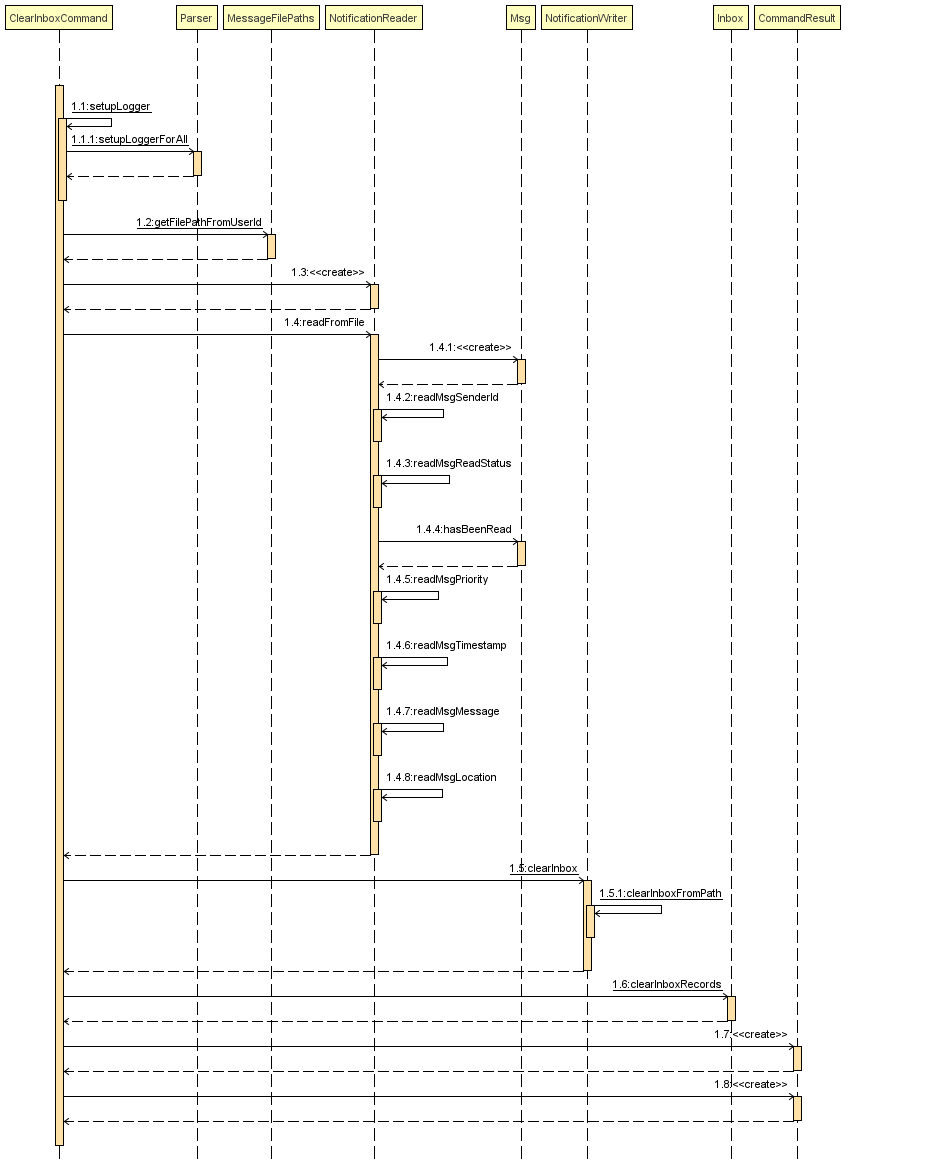
Current Implementation
Once the system is unlocked, you can clear your own inbox should there be too many messages stored in it using this command. Once the command has been entered, ReadNotification object will first be generated to attempt reading from the text file storing messages in your inbox. This is to check that the file exists in the first place. If it reads from the text file successfully, a WriteNotification object will then be generated, instantiating a PrintWriter that overwrites the contents in the text file storing the messages in your inbox.
It also implements the following methods:
-
execute() - executes the "clearinbox" command and displays the result to the user.
-
readFromFile() - method from ReadNotification object that attempts to access the contents of the text file.
-
clearInbox() - method from WriteNotification object that clears the content in the text file storing the user’s messages.
-
clearInboxRecords() - clears any records of messages displayed to ensure that all traces of existing messages are also cleared.
The following is an example usage scenario of the "clearinbox" command:
Step 1: User inputs his password and unlocks the system.
Step 2: User executes "clearinbox" command. If command is successfully executed, the feedback "Inbox cleared!" will be displayed to the user.
3e. "rb" command
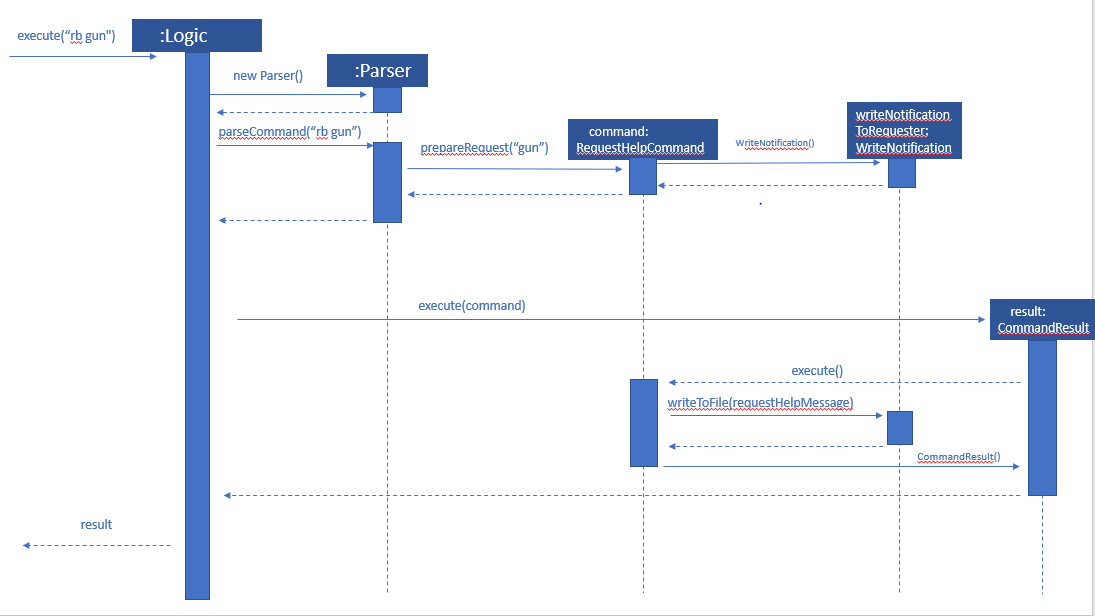
Current Implementation
The rb command is an abbreviation of request backup. Both PO & HQP can use this command as anyone can request for help. When the command is executed, a Msg object is generated. Inside this Msg object, several fields exist which include:
-
Priority of offense
-
Patrol resource ID of requester
-
Patrol resource respective Google Maps URL Location.
-
Current case patrol resource needs help with
Then the Msg object is passed to the writeNotifcation object to be written into the HQP’s message file. The filepath for HQP’s message is ./inboxMessages/headquartersInbox
It also implements these following methods:
-
execute() - executes the "RequestHelpCommand" command and displays result to user.
The following is an example usage scenario of the "rb" command:
Step 1: User inputs PO1 password and logs in as PO1.
Step 2: User executes "rb gun".
Step 3: Parser class identifies user command as "rb" and runs prepareRequest method.
Step 4: prepareRequest method identifies offense & current user ID session.
Step 5: RequestHelpCommand class is instantiated with message template consisting & case which in this case is 'gun'.
Step 6: WriteNotification is instantiated to write the message the HQP inbox file.
Step 7: CommandResult with successful message is returned to Logic class, which then displays to user: "Request for backup case from po1 has been sent to HQP."
Design Considerations
Aspect: How rb command is implemented
-
Alternative 1 (current choice): Writes using ReaderAndWriter class
-
Pros: Data is maintained across multiple sessions
-
Cons: External text files can be tempered
-
-
Alternative 2: Using chat client API
-
Pros: Safe and reliable real time support
-
Cons: Data is not maintained across multiple sessions
-
3f. "dispatch" command
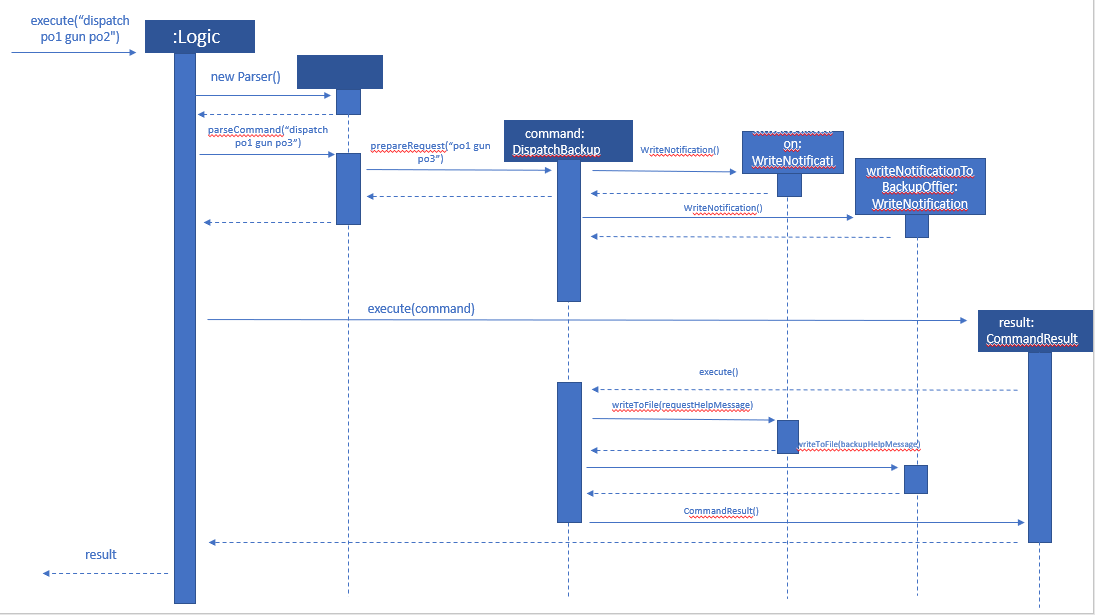
Current Implementation
Only HQP has access to the "dispatch" command. Dispatch command sends a message to both the designated requester & backup officers. The system creates two WriteNotification classes, the first writes to the requester inbox and the second writes to the backup officer inbox.
The message sent to the requester’s inbox includes the ETA for the backup officer with his/her location both in raw longitude & latitude form and Google Maps URL format.
It is similar for the message sent to the backup’s inbox which includes the ETA that he/she should arrive within & Google Maps URL location of the requester’s Location.
It also implements these following methods:
-
execute() - executes "dispatch" command and displays result to user
The following is an example usage scenario of the "dispatch" command:
Step 1: User inputs HQP password and logs in as HQP.
Step 2: User executes "dispatch PO1 gun PO3".
Step 3: Parser class identifies user command as "dispatch" and runs prepareDispatch method.
Step 4: prepareDispatch method identifies PO1 as backup officer, gun as case & PO3 as requester officer.
Step 5: DispatchCommand class is instantiated with 2 different WriteNotification classes for two different files.
Step 6: DispatchCommand object is executed, Msg for requester & backup officer are generated to include content explained above.
Step 7: Both Msg objects are passed to WriteNotification class to be written to the respective recipient files.
Step 8: CommandResult with successful message is returned to Logic class, which then displays to user: "Dispatch for PO3 backup is successful."
Design Considerations
Aspect: How dispatch command is implemented
-
Alternatives: Similar considerations as rb command.
-
Alternatives considered: Chat Client API
-
Pros: Allows real time system with remote access so police officers can view in real time
-
Cons: Chat Client does not store messages after closing application (data does not persist), not much API documentation for beginners
-
4a. "updatestatus" command
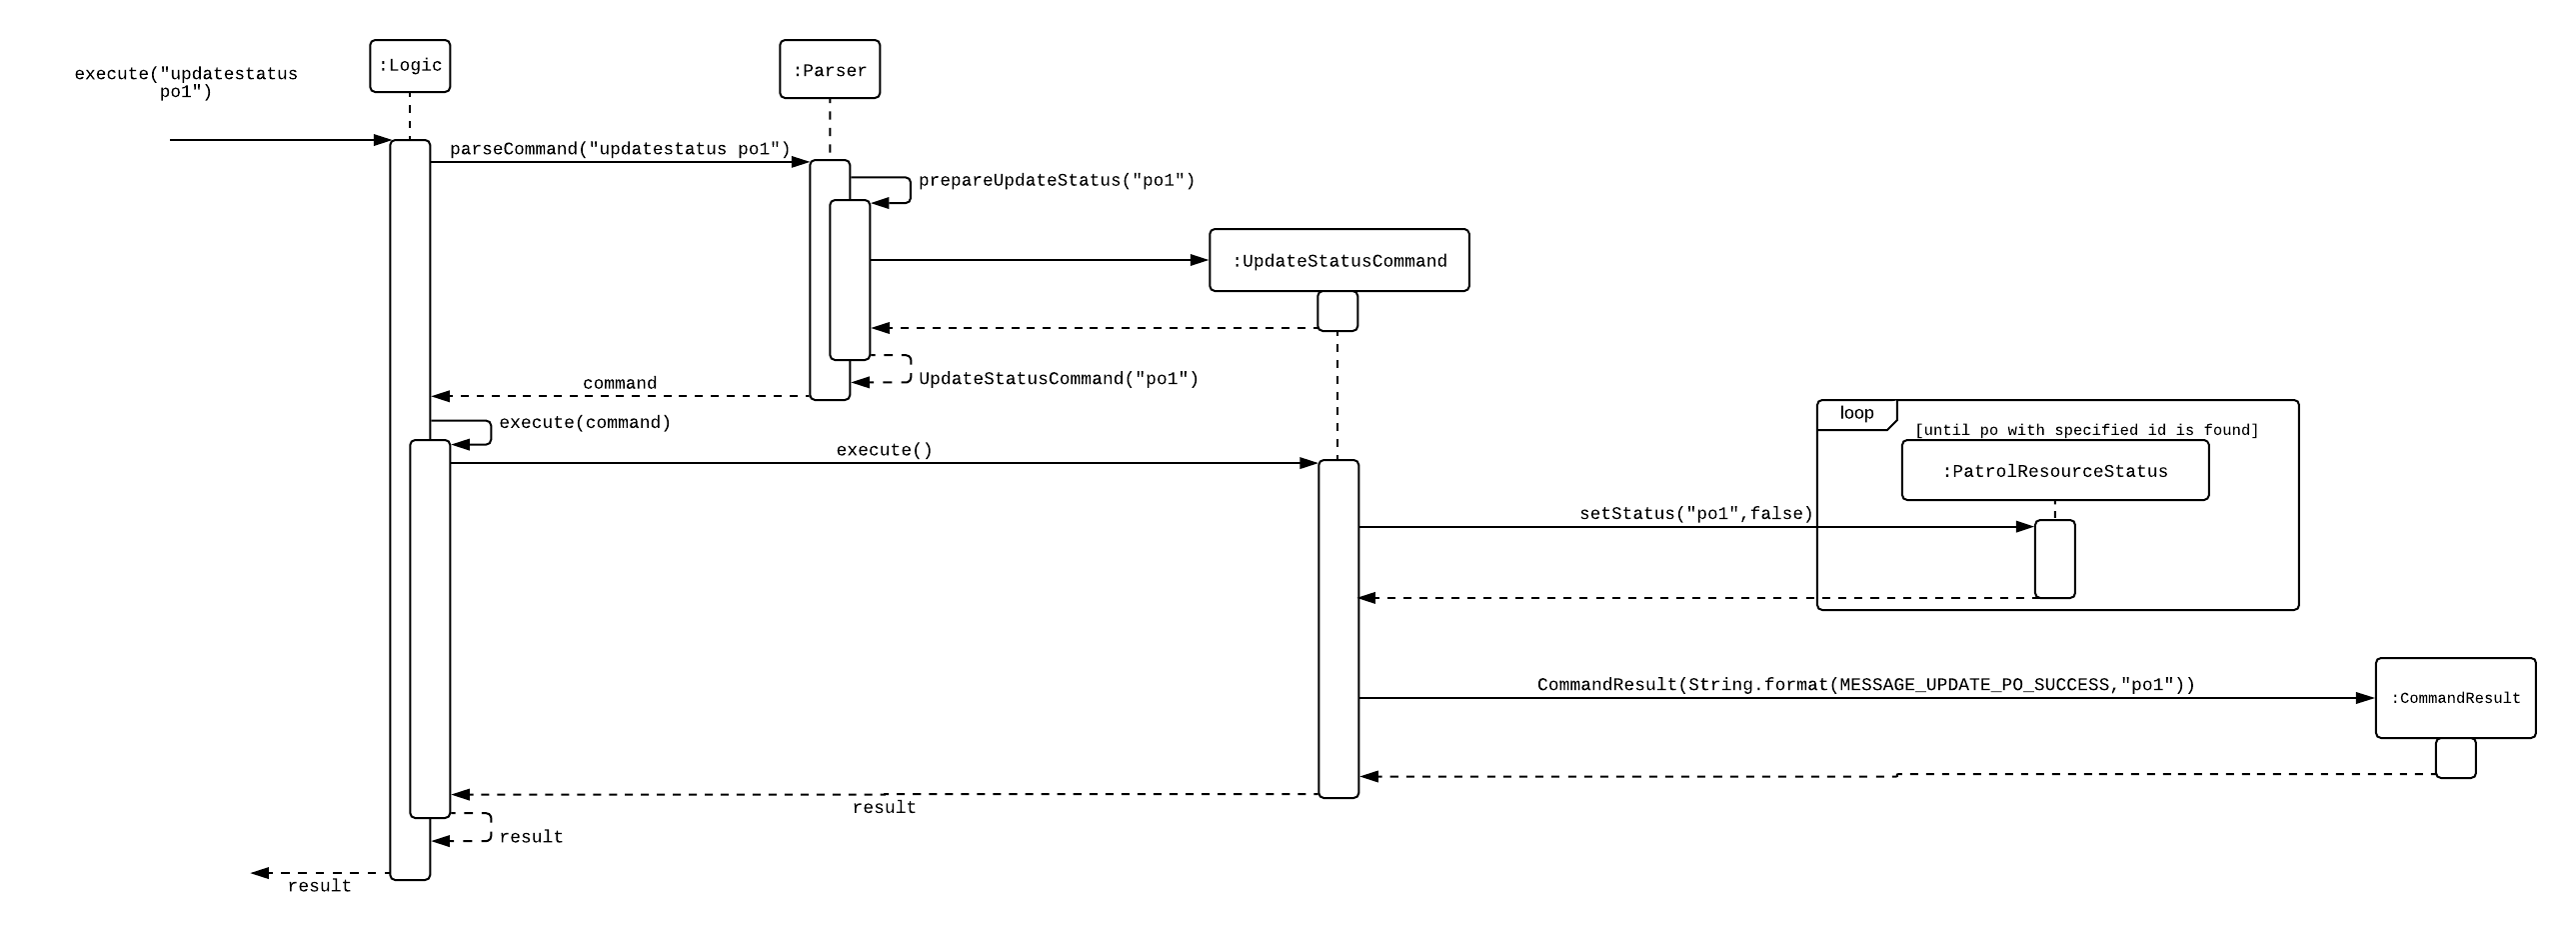
Current Implementation
Only HQP can use this command. This command sets the engagement status(the "isEngaged" boolean) of a PO to false. It also implements the following methods:
-
execute() - executes the "updatestatus po[id]" command, sets the isEngaged boolean to false and displays the result to the user
The following is an example usage scenario of the "updatestatus" command:
Step 1: User inputs password and unlocks the system
Step 2: User executes "updatestatus po1" (example PO here is "po1")
Step 3: Parser class identifies command as "updatestatus" and runs prepareUpdateStatus method.
Step 4: prepareUpdateStatus checks is po1 is a valid PO ID through a regex expression and instantiates a new UpdateStatus command.
Step 5: Logic class calls the execute() method in the UpdateStatusCommand object.
Step 6: execute() also calls for the setStatus() method in PatrolResourceStatus class sets the isEngaged boolean of "po1", in this case, to false.
Step 7: A CommandResult object with the successful message is created to be displayed to the user.
Design Considerations
Aspect: How updatestatus command is implemented
-
Alternative 1 (current choice): Internally implemented statuses of POS
-
Pros: Faster to look up statuses of POs
-
Cons: The statuses reset after you exit the program
-
-
Alternative 2: Using a text file to store the statuses of POs
-
Pros: The statuses are saved even after exiting the system
-
Cons: Time and space complexity increases especially if there are many POs to manage
-
4b. "checkstatus" command
Current Implementation
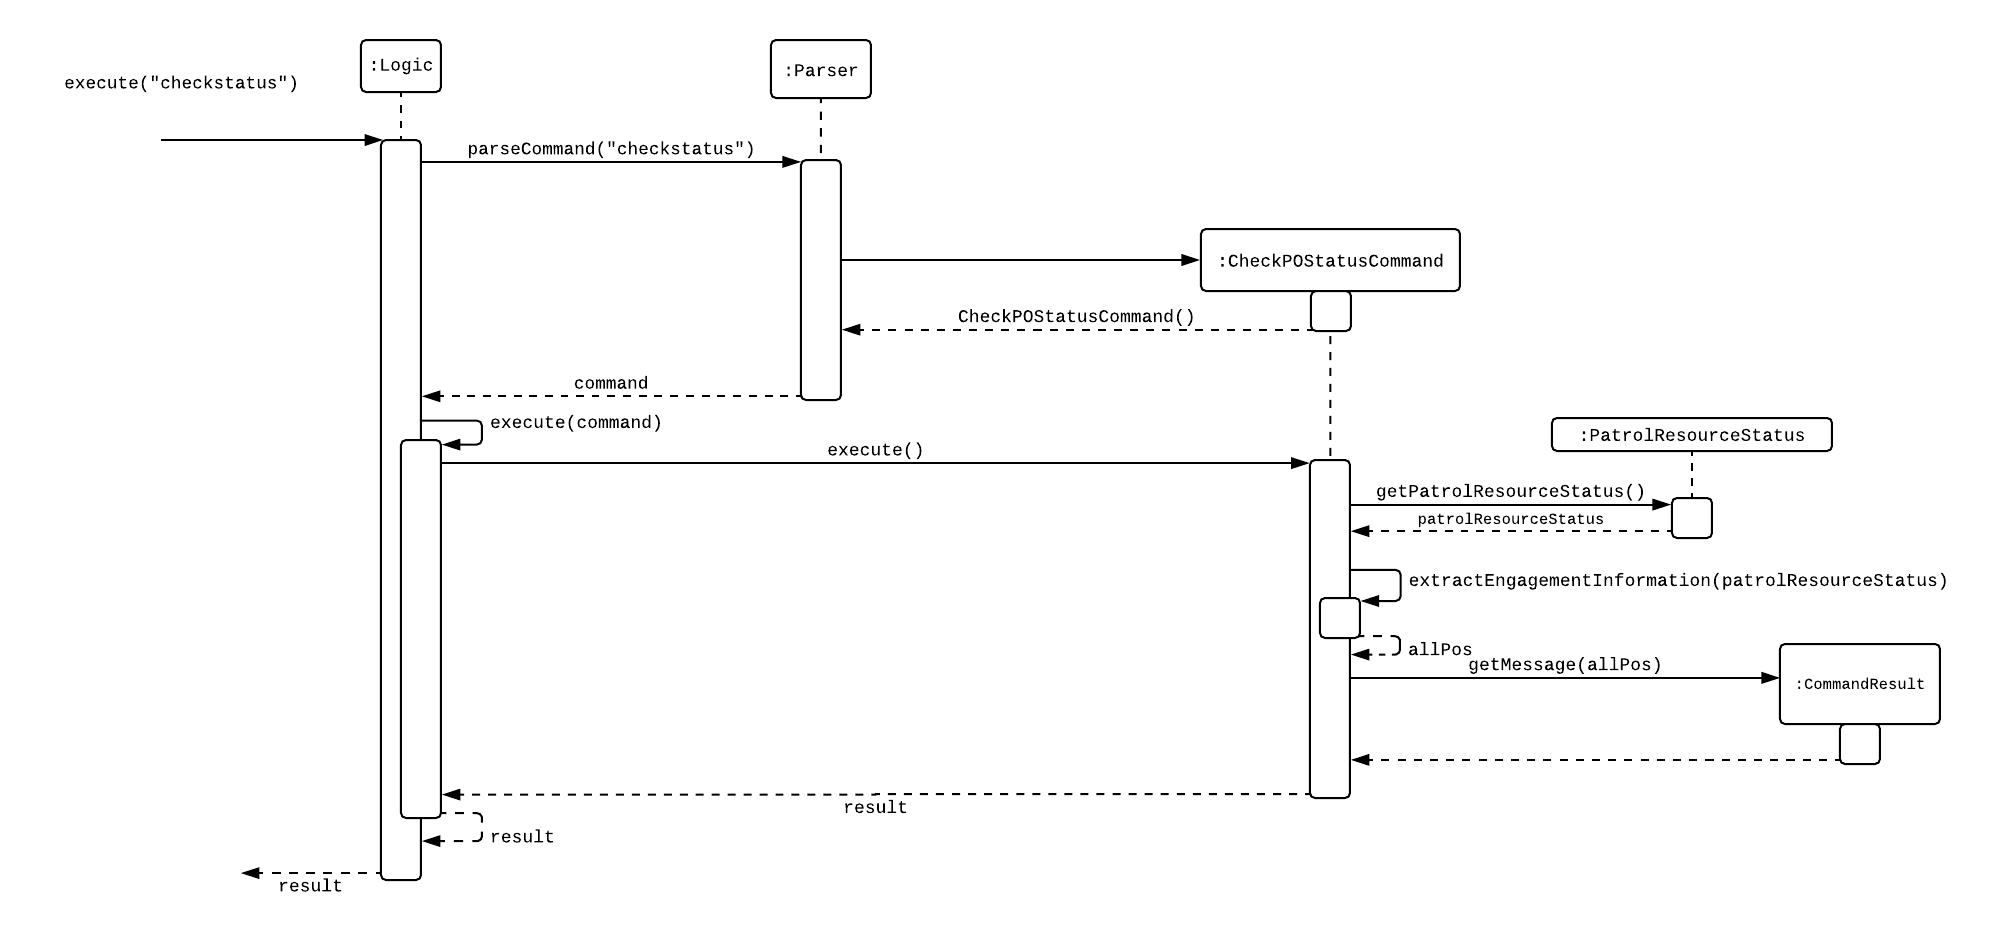
This command lists out all the POs and their current engagement statuses. The POs and their details are stored in an Arraylist as the assumption here is the system will be running continuously for the whole working time, or shift, for example. It also implements the following methods:
-
execute() - executes the "checkstatus" command and stores all POs in a list
-
extractEngagementInformation() - iterates through the ArrayList of POs and only store and return their ID and engagement statuses
The following is an example usage scenario of the "checkstatus" command:
Step 1: User inputs password and unlocks the system.
Step 2: User executes "checkstatus".
Step 3: Parser class identifies command as "checkstatus" and returns a new CheckPOStatusCommand object.
Step 4: Logic class calls the execute() method in the CheckPOStatusCommand object.
Step 5: execute() also calls for the extractEngagementInformation() method and stores the PO Ids and the engagement status in a list.
Step 6: A CommandResult object is created and displays the list to the user.
Design Considerations
Aspect: How updatestatus command is implemented
-
Alternative : Similar considerations as updatestatus
4c. "time" command
Current Implementation
This command displays the current time to both HQP & PO.
-
execute() - executes the "DateTimeCommand" command
The following is an example usage scenario of the "time" command:
Step 1: User inputs password and unlocks the system.
Step 2: User types "time" and executes it.
Step 3: Parser class identifies command as "time" and returns a DateTimeCommand object.
Step 4: Logic class calls the execute() method in the DateTimeCommand object.
Step 5: execute() calls
5. "logout" command
Current Implementation
This command logs the current user out of the System.
-
execute() - executes the "logout" command , all boolean flags related to passwords are set to false and clears the message inboxes.
The following is an example usage scenario of the "logout" command:
Step 1: User executes "logout".
Step 2: decipherUserCommandText() in MainWindow class identifies command as "logout".
Step 3: Boolean flags for isHQP, isPO1, isPO2, isPO3, isPO4, isPO5 in the Password class is set to false. This is done using the lockIsHqp() and lockIsPo() methods in the Password class.
Step 4: isUpdatePasswordConfirm and isUpdatingPassword flags are also set to false through lockUpdatePasswordConfirm() and lockUpdatingPassword() in the Password class is also set to false.
Step 5: resetInboxWhenLogout() in the Inbox class clears all records of displayed messages and resets the number of unread messages to default value of -1.
Step 6: A CommandResult object is created and displays a message that the user is logged out of the System and prompts for a password.
Design Considerations
Aspect: How logout command is implemented
-
Alternative 1 (current choice): Logout extends command.
-
Pros: Easy to implement.
-
Cons: Using MainWindow instead of parser to detect that it is the logout command.
-
-
Alternative 2: Logout as a method in password class.
-
Pros: Can access boolean flags privately in the same class.
-
Cons: Not using abstract class of command.
-
6. Autocorrection feature
Current Implementation
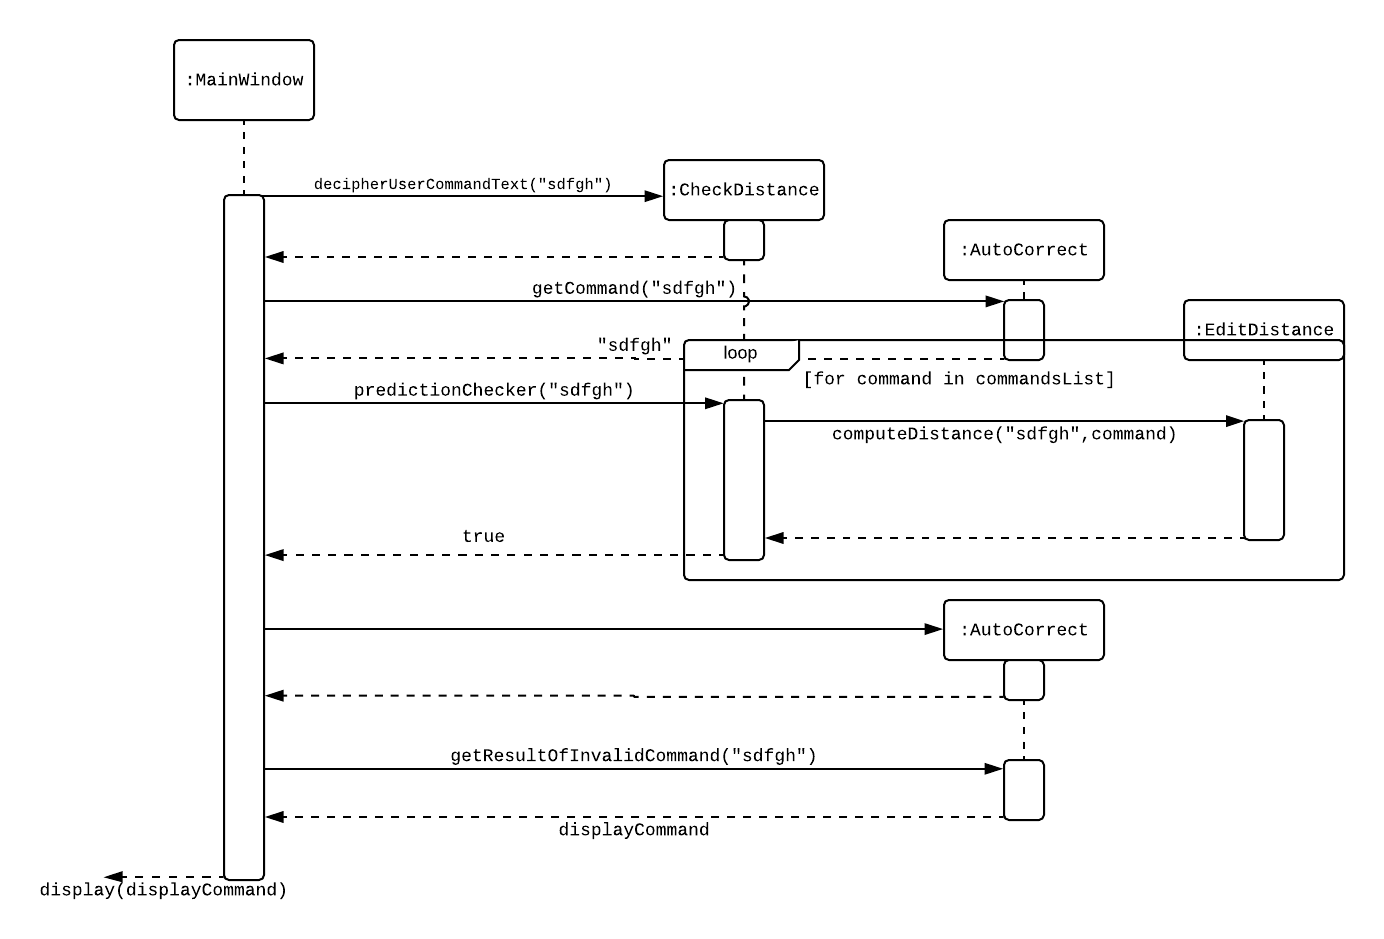
The autocorrect mechanism is facilitated by use of dynamic programming. The algorithm called EditDistance checks the number of single character changes to be made to convert an invalid input into one expected by the system. Currently, changes involving one single character can be corrected by the system for commands and changes involving one or two single characters can be corrected by the system for NRICs. It implements the following operations:
-
checkDistance() - It returns the edit distance needed to convert one string to the other. In this case, it returns the number of single character changes (either addition of a character, deletion of a character or changing a character) to convert invalid user input into its most probable correct implementation.
Step 1: The user inputs his password and unlocks the system.
Step 2: The user enters an invalid command.
Step 3: The system predicts the most probable intended command the user would have wanted to input and then prompts the user to use the prediction given in its valid format.
Step 1: The user inputs his password and unlocks the system.
Step 2: The user tries to edit, delete or check an invalid NRIC.
Step 3: The system predicts the most probable intended NRIC the user would have wanted to input and then prompts the user to use the prediction given in the valid format of the command.
The input is checked by the algorithm in the MainWindow before it is sent to the Parser class. This is to ensure invalid input can be caught by the algorithm to give its correction before it is deemed as invalid by the Parser during which time all commands will be laid out to the user.
Design Considerations
Aspect: How autocorrect feature is implemented
-
Alternative 1 (current choice): Using user input directly from MainWindow class
-
Pros: Able to autocorrect raw input
-
Cons: More front-end coding through MainWindow class
-
-
Alternative 2: Running the algorithm from the Parser class
-
Pros: Implementing new code with existing code
-
Cons: Difficult to run autocorrect through parser
-
7. "shutdown" command
Current Implementation
This command shuts down the System.
-
execute() - executes the "shutdown" command and returns all boolean flags related to passwords are set to false.
The following is an example usage scenario of the "logout" command:
Step 1: User executes "shutdown".
Step 2: Boolean flags for isHQP, isPO1, isPO2, isPO3, isPO4, isPO5 in the Password class is set to false. This is done using the lockIsHqp() and lockIsPo() methods in the Password class.
Step 3: isUpdatePasswordConfirm and isUpdatingPassword flags are also set to false through lockUpdatePasswordConfirm() and lockUpdatingPassword() in the Password class is also set to false.
Step 4: mainApp.stop() in MainWindow class shuts down the system
7a. "help" command
Current Implementation
The help command returns the list of commands which can be input by the user based on their level of access. A HQP user is shown all the commands while a PO user is shown only limited commands.
It also implements these methods:
-
execute() - executes the "help" command itself and displays result to user
This is an example scenario of "help" command
Step 1: The user inputs PO password and logs in as PO.
Step 2: The user types "help" and executes it.
Step 3: Parser class determines the command word and return the list of commands that can be input by a PO.
7b. "add" command
Current Implementation
Only a HQP may use this command. This command allows HQP to update the Police Records with a new subject. The subject can be added with the details- name, NRIC, date of birth, postal code, status, offense and optional past offences.
It also implements these methods:
-
execute() - executes the "add" command itself and displays result to user
This is an example scenario of "add" command
Step 1: The user inputs HQP password and logs in as HQP.
Step 2: The user types "add John Doe n/s1234567a d/1996 p/510246 s/xc w/none o/theft o/drugs" and executes it.
Step 3: Parser class determines the command word and runs the prepareAdd method
Step 4: prepareAdd method in Parser class would parse the inputs from the input text to instantiate the AddCommand class.
Step 5: Logic class then calls the execute method on AddCommand Object. Person with NRIC "s1234567a" is added in the addressbook.
Step 6: CommandResult with successful message is returned to Logic class, which then displays to user: "New person added: John Doe Nric: s1234567a DateOfBirth: 1996 Postal Code: 510246 Status: xc Wanted For: [none] Past Offences:[drugs][theft]".
Logging
We are using java.util.logging package for logging. The Parser class is used to manage the logging levels and logging destinations.
-
The logging level can be controlled using the
logLevelsetting in the configuration file -
The
Loggerfor a class can be obtained usingParser.getLogger(Class)which will log messages according to the specified logging level -
Currently log messages are output through:
Consoleand to a.logfile.
Logging Levels
-
SEVERE: Critical problem detected which may possibly cause the termination of the application -
WARNING: Can continue, but with caution -
INFO: Information showing the noteworthy actions by the App -
FINE: Details that is not usually noteworthy but may be useful in debugging e.g. print the actual list instead of just its size
Configuration
Certain properties of the application can be controlled (e.g App name, logging level) through the configuration file (default: config.json).
Documentation
We use asciidoc for writing documentation.
| We chose asciidoc over Markdown because asciidoc, although a bit more complex than Markdown, provides more flexibility in formatting. |
Editing Documentation
See UsingGradle.adoc to learn how to render .adoc files locally to preview the end result of your edits.
Alternatively, you can download the AsciiDoc plugin for IntelliJ, which allows you to preview the changes you have made to your .adoc files in real-time.
Publishing Documentation
See UsingTravis.adoc to learn how to deploy GitHub Pages using Travis.
Converting Documentation to PDF format
We use Google Chrome for converting documentation to PDF format, as Chrome’s PDF engine preserves hyperlinks used in webpages.
Here are the steps to convert the project documentation files to PDF format.
-
Follow the instructions in UsingGradle.adoc to convert the AsciiDoc files in the
docs/directory to HTML format. -
Go to your generated HTML files in the
build/docsfolder, right click on them and selectOpen with→Google Chrome. -
Within Chrome, click on the
Printoption in Chrome’s menu. -
Set the destination to
Save as PDF, then clickSaveto save a copy of the file in PDF format. For best results, use the settings indicated in the screenshot below.

Site-wide Documentation Settings
The build.gradle file specifies some project-specific asciidoc attributes which affects how all documentation files within this project are rendered.
Attributes left unset in the build.gradle file will use their default value, if any.
|
| Attribute name | Description | Default value |
|---|---|---|
|
The name of the website. If set, the name will be displayed near the top of the page. |
not set |
|
URL to the site’s repository on GitHub. Setting this will add a "View on GitHub" link in the navigation bar. |
not set |
|
Define this attribute if the project is an official SE-EDU project. This will render the SE-EDU navigation bar at the top of the page, and add some SE-EDU-specific navigation items. |
not set |
Per-file Documentation Settings
Each .adoc file may also specify some file-specific asciidoc attributes which affects how the file is rendered.
Asciidoctor’s built-in attributes may be specified and used as well.
Attributes left unset in .adoc files will use their default value, if any.
|
| Attribute name | Description | Default value |
|---|---|---|
|
Site section that the document belongs to.
This will cause the associated item in the navigation bar to be highlighted.
One of: * Official SE-EDU projects only |
not set |
|
Set this attribute to remove the site navigation bar. |
not set |
Site Template
The files in docs/stylesheets are the CSS stylesheets of the site.
You can modify them to change some properties of the site’s design.
The files in docs/templates controls the rendering of .adoc files into HTML5.
These template files are written in a mixture of Ruby and Slim.
|
Modifying the template files in |
Use Cases
The use cases for the current features and commands implemented can be found in Appendix B.
Testing
To run tests for the project, complete the step below.
-
In IntelliJ, right-click on the
testfolder and chooseRun 'All Tests'
Appendix A: User Stories
Priorities: High (must have) - * * *, Medium (nice to have) - * *, Low (unlikely to have) - *
PO- Police Officer HQP- Headquarters Personnel
| Priority | As a … | I want to … | So that I can… |
|---|---|---|---|
|
PO |
request backup efficiently and quickly |
get help in dangerous situations like capturing an escaped criminal, saving a person’s life |
|
PO |
know if accused is dangerous |
know the steps I should take to handle the accused |
|
PO |
easily access numerous NRICs and commands with autocorrection |
be efficient in going through many records even if some mistake is made |
|
PO |
quickly screen the subject using his NRIC |
know his current status and past offences if any |
|
HQP |
know the screening history of a particular subject using his NRIC |
use it in my investigation |
|
PO |
secure my device with a password |
prevent breach of confidential data |
|
HQP |
update password of any device regularly |
so that I can increase security |
|
PO |
know the serial number and battery level |
to return it to HQ and charge it when necessary |
Appendix B: Use Cases
(For all use cases below, the System is the Police Records and the User is either the `Police Officer (PO)' or 'Headquarters Personnel (HQP)', unless specified otherwise)
Use case: Enter Headquarters Personnel password
MSS
-
User opens System.
-
System prompts User to enter his password.
-
User enters HQP password.
-
System displays message "Welcome Headquarters Personnel" and System prompts User for a command. Only HQP commands are set to accessible.
Use case ends.
Extensions
-
3a. User enters invalid password.
-
3a1. System displays an error message and allows one less attempt for User at entering a correct password, with a maximum of 5 attempts.
Use case resumes at step 1.
-
-
3b. The number of attempts reaches zero.
-
3b1. System shuts down.
Use case ends.
-
Use case: Enter Police Officer password
MSS
-
User opens System.
-
System prompts User to enter his password.
-
User enters Police Officer password.
-
Only Police Officer commands are set to accessible, System displays message "Welcome Police Officer" and System prompts User for a command.
Use case ends.
Extensions
-
3a. User enters invalid password.
-
3a1. System displays an error message and allows one less attempt for User at entering a correct password, with a maximum of 5 attempts.
Use case resumes at step 1.
-
-
3b. The number of attempts reaches zero.
-
3b1. System shuts down.
Use case ends.
-
Use case: Logout
MSS
-
User logs out of the System at any point.
-
System sets all commands to inaccessible, displays System logout message and prompts User for password.
Use case ends.
Use case: Update any password
MSS
-
User requests to update password.
-
System prompts User for current password to change.
-
User enters existing password.
-
System prompts User to enter new password.
-
User enters new alphanumeric password.
-
System prompts User to enter new password again.
-
User enters same new alphanumeric password.
-
System updates password to change to the new alphanumeric password and displays update password success message.
Use case ends.
Extensions
-
3a. User enters invalid password.
-
3a1. System displays an error message and allows one less attempt for User at entering a correct password, with a a maximum of 5 attempts.
Use case resumes at step 2.
-
-
3b. The number of attempts reaches zero.
-
3b1. System shuts down.
Use case ends.
-
-
5a or 7a. User enters new password without a number.
-
5a1 or 7a1. System shows error message to include at least one number and prompts User to enter new alphanumeric password again.
Use case resumes at step 5.
-
5b or 7b. User enters new password without a letter.
-
5b1 or 7b1. System shows error message to include at least one letter and prompts User to enter new alphanumeric password again.
Use case resumes at step 5.
-
5c or 7c. User enters new password without a letter nor a number.
-
5c1 or 7c1. System shows error message for invalid new password.
Use case resumes at step 5.
Use case: Add person
MSS
-
User opens System.
-
System prompts User to enter his password.
-
User enters password.
-
System prompts user to enter his command.
-
User requests to add person to the list.
-
System adds person to the list and informs User that person has been successfully added.
Use case ends.
Extensions
-
6a. Person already exists in the list.
-
6a1. System shows an error message.
Use case ends.
-
-
6b. User enters person’s details with invalid formats.
-
6b1. System shows an error message.
Use case resumes at step 5.
-
-
*a. At any time, User cancels add action.
-
*a1. System requests for confirmation to cancel.
-
*a2. User confirms cancellation.
Use case ends.
-
Use case: Delete person
MSS
-
User opens System.
-
System prompts user to enter his password.
-
User enters password.
-
System prompts user to enter his command.
-
User keys in NRIC of person to delete
-
System deletes the person.
-
User requests to list persons.
-
System shows a list of persons.
-
User requests to delete a specific person in the list.
-
System deletes the person.
Use case ends.
Extensions
-
3a. User enters an invalid password.
-
3a1. System shows an error message.
Use case resumes at step 1.
-
-
5a. User enters invalid NRIC.
-
5a1. System shows an error message.
Use case resumes at step 5.
-
-
*a. At any time, User chooses to cancel the delete action.
-
*a1. System requests confirmation to cancel.
-
*a2. User confirms the cancellation.
Use case ends.
-
Use case: Edit person
MSS
-
User opens System.
-
System prompts user to enter his password.
-
User enters password.
-
System prompts user to enter his command.
-
User keys in edit command with NRIC and new details of person to change
-
System edits the person’s respective details.
Use case ends.
Extensions
-
3a. User enters an invalid password.
-
3a1. System shows an error message.
Use case resumes at step 2.
-
-
4a. User enters invalid NRIC format
-
4a1. System shows an error message stating that NRIC has a certain alphanumeric format.
Use case resumes at step 4.
-
-
4b. User enters NRIC of a person that does not exist in the police records
-
4b1. System shows an error message stating that person could not be found.
Use case resumes at step 4.
-
-
4c. User enters edit command with only NRIC tag without other details to change.
-
4c1. System shows an error message stating that format is invalid
Use case resumes at step 4.
-
-
4d. User enters edit command with proper NRIC format and Postal Code that is not 6 digits long.
-
4d1. System shows an error message stating that Postal Code must be 6 digits long.
Use case resumes at step 4.
-
-
4e. User enters edit command with proper NRIC and wanted status that is invalid.
-
4e1. System shows an error message stating that wanted status should be only of 3 types.
Use case resumes at step 4.
-
-
4f. User enters edit command with proper NRIC and invalid offense.
-
4f1. System shows an error message stating offense is not in the list.
-
4f2. System shows list of valid offenses
Use case resumes at step 4.
-
-
8a. User enters person’s details with invalid format.
-
8a1. System shows an error message suggesting the correct usage of the command.
Use case resumes at step 4.
-
Use case: Find person
MSS
-
User boots System.
-
System prompts user to enter his password.
-
User enters password.
-
System prompts user to enter his command.
-
User requests to find person
-
System prompts User to key in NRIC to find
-
User enters NRIC of person
-
System displays details of person, if found on the list.
Use case ends.
Extensions
-
3a. User enters an invalid password.
-
3a1. System shows an error message.
Use case resumes at step 2.
-
-
7a. User enters an NRIC that does not exist in the list.
-
7a1. System informs User that person is not in the list.
Use case ends.
-
-
7b. User enters person’s NRIC with invalid format.
-
7b1. System shows an error message.
Use case resumes at step 6.
-
-
8a. The list of persons is empty.
-
8a1. System shows an error message.
Use case ends.
-
Use case: Check person
MSS
-
User opens System.
-
System prompts user to enter his password.
-
User enters password.
-
System prompts user to enter his command.
-
User requests to check person’s screening history.
-
System prompts User to key in NRIC to check.
-
User enters NRIC of person.
-
System displays past screening timestamps of person, if found on the list.
Use case ends.
Extensions
-
3a. User enters an invalid password.
-
3a1. System shows an error message.
Use case resumes at step 2.
-
-
5a. The list is empty.
-
5a1. System shows an error message.
Use case ends.
-
-
6a. User enters person’s details with invalid format.
-
6a1. System shows an error message.
Use case resumes at step 6.
-
-
6b. User enters an NRIC that does not exist in the list.
-
6b1. System informs User that person is not in the list.
Use case ends.
-
-
6c. User enters the an NRIC with invalid format.
-
6c1. System shows an error message.
Use case ends.
-
Use case: Update status of a PO
MSS
-
User opens System.
-
System prompts user to enter his password.
-
User enters password.
-
System prompts user to enter his command.
-
User requests to update the engagement status of a PO (e.g "po1") to free
-
System prompts User to specify the PO
-
User enters the PO
-
System shows the user that the PO’s status has been updated
Use case ends.
Extensions
-
3a. User enters an invalid password.
-
3a1. System shows an error message.
Use case ends.
-
-
5a. User enters Command in an invalid format.
-
5a1. System shows an error message
Use case ends.
-
-
7a. User enters an invalid PO ID or a PO that does not exist.
-
7a1. System shows an error message
Use case ends.
-
Use case: Check status of all POs
MSS
-
User opens System.
-
System prompts user to enter his password.
-
User enters password.
-
System prompts user to enter his command.
-
User requests to see all POs and their current engagement status
-
System shows the user a list of POs and each of their engagement status
Use case ends.
Extensions
-
3a. User enters an invalid password.
-
3a1. System shows an error message.
Use case ends.
-
-
5a. User enters Command in an invalid format.
-
5a1. System shows an error message
Use case ends.
-
Use case: Autocorrection of commands
MSS
-
User opens System.
-
System prompts user to enter his password.
-
User enters password.
-
System prompts user to enter his command.
-
User enters invalid command.
-
System predicts what command the user would have wanted to type if it finds a correction and displays the valid implementation of the command.
Use case ends.
Extensions
-
3a. User enters an invalid password.
-
3a1. System shows an error message.
Use case resumes at step 2.
-
-
6a. User enters an invalid command for which the system cannot find a prediction.
-
6a1. System shows error message.
Use case ends.
-
Use case: Autocorrection of NRICs
MSS
-
User opens System.
-
System prompts user to enter his password.
-
User enters password.
-
System prompts user to enter his command.
-
User enters delete, edit or check command with invalid NRIC.
-
System predicts the NRIC the user would have wanted to type if it finds a correction and displays the valid implementation of the command.
Use case ends.
Extensions
-
3a. User enters an invalid password.
-
3a1. System shows an error message.
Use case resumes at step 2.
-
-
5a. User enters an invalid delete, edit or check command.
-
5a1. System displays the valid usage of the command.
Use case ends.
-
-
6a. User enters an invalid NRIC for which the system cannot find a prediction.
-
6a1. System shows error message.
Use case ends.
-
Use case: Show unread messages
MSS
-
User opens System.
-
System prompts user to enter his password.
-
User enters password.
-
System prompts user to enter his command.
-
User requests to display unread messages in inbox.
-
System prints the number of unread messages and list of unread messages.
Use case ends.
Extensions
-
5a. There are no messages.
-
5a1. System informs user that there are no messages available.
Use case ends.
-
-
5b. There are no unread messages.
-
5b1. System informs user that there are no unread messages.
Use case ends.
-
-
5c. File containing user’s inbox messages is missing.
-
5c1. System informs user that there was an error loading messages.
Use case ends.
-
Use case: Show all messages
MSS
-
User opens System.
-
System prompts user to enter his password.
-
User enters password.
-
System prompts user to enter his command.
-
User requests to display all messages in inbox.
-
System prints the total number of messages, number of unread messages and full list of messages.
Use case ends.
Extensions
-
5a. There are no messages.
-
5a1. System informs user that there are no messages available.
Use case ends.
-
-
5b. There are no unread messages.
-
5b1. System informs user of his total number of messages, that there are 0 unread messages and the full list of messages.
Use case ends.
-
Use case: Clear Inbox
MSS
-
User opens System.
-
System prompts user to enter his password.
-
User enters password.
-
System prompts user to enter his command.
-
User enters command to clear his inbox.
-
System informs user that his inbox has been cleared.
Use case ends.
Extensions
-
5a. There are no messages.
-
5a1. System informs user that inbox has been cleared.
Use case ends.
-
-
6a. File storing user’s inbox messages cannot be found.
-
6a1. System informs user that inbox clearance has been unsuccessful and that the storage file is missing.
Use case ends.
-
Use case: Read messages
MSS
-
User opens System.
-
System prompts user to enter his password.
-
User enters password.
-
System prompts user to enter his command.
-
User enters command to
Show Unread Messages -
System finds the text file storing user’s messages and displays a numbered list of messages that are unread.
-
User enters the message number he wishes to mark as read.
-
System updates message read status to 'read'.
Use case ends.
Extensions
-
7a. User enters an invalid index.
-
7a1. System shows an error message and informs user of the valid index range.
Use case ends.
-
-
7b. User enters an extremely large number for the index.
-
7b1. System informs user that the index entered is too large.
-
-
7c. There are no unread messages.
-
7c1. System informs user that there are no unread messages.
Use case ends.
-
-
*a. At anytime, user chooses to stop marking messages as read.
Use case ends.
Use Case: Request Backup
MSS
-
User opens System.
-
System prompts User to enter his password.
-
User enters his password.
-
System prompts User to key in command.
-
User types in to request backup with pre-defined case types.
-
System adds message into Headquarters inbox.
-
User will be notified with success message.
Use case ends.
Extensions
-
3a. User enters an invalid password.
-
3a1. System shows an error message.
Use case resumes in step 2.
-
-
5a. User enters an invalid input with invalid command format.
-
5a1. System shows error message and prompts correct format for request feature.
Use case resumes from step 4.
-
-
5b. User enters an invalid case type.
-
5b1. System shows an error message and prompts user with list of offences.
Use case resumes at step 4.
-
Use Case: Dispatch Backup
MSS
-
User opens System.
-
System prompts User to enter his password.
-
User enters his password.
-
System prompts User to key in command.
-
User keys in backup officer to assist requester with case type.
-
System adds new message with ETA & location of backup officer and case type in requester inbox.
-
System adds new message with ETA & location of requester and case type in backup officer inbox.
Use case ends.
Extensions
-
0a. User keys in invalid command format.
-
0a1. System shows error message and prompts correct format for dispatch feature.
Use case resumes from step 4.
-
-
3a. The entered password is invalid.
-
3a1. System shows an error message.
Use case resumes in step 2.
-
-
5a. User is not a Headquarter Personnel.
-
5a1. System shows an error message stating invalid credentials.
Use case resumes in step 4.
-
-
5b. User enters an engaged police officer as backup.
-
5b1. System shows an error message stating that the police officer entered is engaged.
Use case resumes in step 4.
-
-
5c. User enters an invalid case type.
-
5c1. System shows an error message and prompts user with list of offences.
Use case resumes at step 4.
-
-
5d. User enters same officer for backup & requester.
-
5d1. System shows an error message stating that backup & requester is same officer.
Use Case resumes at step 4.
-
Appendix C: Non Functional Requirements
-
Should work on any mainstream OS as long as it has Java 9 or higher installed.
-
Should be able to hold up to 1000 persons.
-
Should come with automated unit tests and open source code.
-
Should favor DOS style commands over Unix-style commands.
-
Business/domain rules:
-
Device should accept any more input after 9 characters when PO is inputting NRIC
-
Device will constantly remind PO to charge if battery level goes below a certain level.
-
-
Accessibility: Different levels of access for POs and HQPs and drivers (ambulance,fire truck).
-
Performance requirements: The system should respond within two seconds.
-
Security requirements: The system should be password locked.
-
Data requirements:
-
Data should persist, and not volatile.
-
Data should be recoverable from last save point
-
Appendix D: Glossary
- Headquarters Personnel (HQP)
-
A PO with a high level of authorised access (read and write) to the information of subjects.
- ID
-
Refers to the identity of the user of the program based on the password he uses the log in. Currently, there can be 6 possible users - 1 HQP and 5 POs.
- Mainstream OS
-
Windows, Linux, Unix, OS-X
- NRIC
-
Stands for National Registration Identity Card. It is a 7-digit number preceded and succeeded by a letter. This forms a sequence of characters unique to each person and is used for identification purposes.
- Police Officer (PO)
-
A police officer that is on patrol duty. Has low level of authorised access (read only) to subject’s information.
- Police Records
-
Refers to the database of information that the system has of people, which includes their NRIC, name, address, past offences and status.
- Status
-
A status that is used to describe the engagement level of POs on duty. He can either be engaged (true) or free (false). It is also used to describe a subject, should he have a criminal record: wanted, xc (ex-convict), and clear.
- Subject
-
A person that is being screened by a PO.
- System
-
Refers to the
PRISMApplication itself (i.e. when a user exits the system, he closes the application).
Appendix E: Instructions for Manual Testing
Given below are instructions to test the app manually.
| These instructions only provide a starting point for testers to work on; testers are expected to do more exploratory testing. |
| If you want to work with pre-populated data, do not tamper with any of the text files. Should they be tampered accidentally, delete the text file that was tampered and relaunch the jar file to regenerate the text file. |
Launch
-
Initial launch
-
Download the jar file and copy into an empty folder
-
Double-click the jar file
Expected: Shows the GUI with a set of sample persons. The window size may not be optimum. Input "list" command after logging to check if the data is loaded successfully -
Resize the window if needed
-
Accounts for both HQP and POs
There are a total of 6 accounts (1 HQP and 5 POs) available in the sample data:
| User | Password |
|---|---|
HQP |
papa123 |
PO1 |
popo1 |
PO2 |
popo2 |
PO3 |
popo3 |
PO4 |
popo4 |
PO5 |
popo5 |
Saving Data
-
Dealing with missing/corrupted data files
-
As mentioned earlier, if the jar file is run with any of the data files missing, the jar file will auto-generate the required data files with pre-populated data for the purpose of testing.
-
Update password
-
Updates password of a user
-
Prerequisites: Logged in as HQP
-
Test case:
-
Enter existing password to be updated, for e.g: 'popo1'
-
Enter new alphanumeric password (at least 5 characters long) for example 'police1'
-
Enter same password again, i.e 'police1'
-
Expected: Success message shown
-
-
Viewing Help
-
Displays a list of commands available for the current user
-
Prerequisites: Logged in as HQP or PO
-
Test case: 'help'
Expected: Shows list of available commands
-
Check time
-
Shows the current time
-
Prerequisites: Logged in as HQP or PO
-
Test case: 'time'
Expected: Shows current time
-
Reading notifications from inbox (showunread & inbox)
-
Prerequisites: Logged in as either HQP or PO.
-
Dealing with missing data files
-
If data files are missing while the application is running, the application will generate the required data files. However if for some reason that doesn’t happen, the command would throw an exception, indicating to the user that data file for user’s inbox cannot be found.
-
-
Reading an inbox with no messages
-
showunreadA feedback will be displayed to the user indicating that there are no unread messages. -
inboxA feedback will be displayed to the user indicating the total number of messages in the inbox, and 0 unread messages.
-
Marking notifications as read
-
Prerequisites: Logged in as either HQP or PO. Inbox must have been opened (use of
inboxorshowunreadcommand) as well. -
Dealing with an unopened inbox
-
If you have not used
showunreadorinboxcommand, a feedback will be displayed ot user indicating that inbox is not opened yet.
-
-
Dealing with an unopened inbox after logging out and logging in again
-
If you open your inbox and log out (
logout) without exiting the application, you will still need to re-open your inbox before usingreadcommand. Otherwise, the system will display a feedback that you have not opened your inbox.
-
-
Dealing with no (unread) messages in inbox
-
A feedback will be displayed to you indicating that there are no unread messages.
-
-
Dealing with invalid indices
-
If you enter a negative number, or a number larger than the number of unread messages, a feedback will be displayed indicating what the valid range of indices are.
-
If you enter a nonsense value such as a character or symbol, a feedback will be displayed indicating that you have entered the command with an invalid format.
-
If you enter a positive number for the index that is bigger than the threshold set, a feedback will be displayed indicating that the index entered was too large.
-
Clearing your inbox
-
Dealing with missing data files
-
If data files are missing while the application is running, the application will generate the required data files. However if for some reason that doesn’t happen, the command would throw an exception, indicating to the user that data file for user’s inbox cannot be found.
-
Request backup for specific case
-
Sends a message to HQP inbox with case, patrol resource ID & location in Google Maps URL
-
Prerequisites: Logged in as HQP or PO
-
Test case: 'rb gun'
Expected: Success message will be displayed to the user stating request sent -
Test case: 'rb bob'
Expected: Invalid offense message error shwon, valid offenses will be presented in a list
-
Dispatch police officer for specific case to requester
-
Sends a message to backup officer & requester with Case, Location & Estimated Time of Arrival
-
Prerequisites: Logged in as HQP only
-
Test case: 'dispatch po1 riot po3'
Expected: Success message will be displayed to the user stating backup successful -
Test case: 'dispatch po1 bob po3'
Expected: Invalid offense message error shown -
Test case: 'dispatch po1 gun po3' (po1 engaged already) Expected: Error message shown
-
Test case: 'dispatch po1 gun po1'
Expected: Error message shown -
Test case: 'dispatch bobo gun po1'
Expected: Error message shown
-
Adding a person
-
Adds a person to the Police records
-
Prerequisites: Logged in as HQP
-
Test case: 'add John Doe n/s1234567a d/1996 p/510246 s/wanted w/none o/theft o/drugs
Expected: If wanted, wantedFor parameter cannot be none, error message shown -
Test case: 'add John Doe n/s1234567a d/1996 p/510246 s/xc w/none o/theft o/drugs'
Expected: If person is not found, success message will be shown, else, a duplicate person error message will be shown instead -
Test case: 'add John Doe s1234567a d/1996 p/510246 s/xc w/none o/theft o/drugs' (or any other missing prefixes)
Expected: Invalid command format, error message is shown -
Test case: 'add John Doe n/s123a d/1996 p/510246 s/xc w/none o/theft o/drugs (or any other invalid data) Expected: Error message for invalid data format will be shown
-
List all persons
-
Displays a list of all persons
-
PrerequisitesL Logged in as HQP or PO
-
Test case: 'list'
Expected: List of persons, if any, is shown
-
Finding a person in the Police Records
-
Finds a person using the NRIC parameter to see his/her details
-
Prerequisites: Logged in as HQP or PO
-
Test case: 'find s1234567a' (Assuming person with this NRIC exists)
Expected: Person’s details will be displayed -
Test case: 'find s1234567a' (If person does not exist in the Police Records)
Expected: Error message stating person not found will be shown -
Test case: 'find ' or 'find 11111'
Expected: Invalid command format, error message will be shown
-
Checking a person’s screening history
-
Check a person’s screening history in the form of timestamps
-
Prerequisites: Logged in as HQP
-
Test case: 'check s1234567a' (Assuming person with this NRIC exists)
Expected: A list of timestamps and the number of times person was screened will be displayed -
Test case: 'check s1234567a' (If person does not exist in the Police Records)
Expected: Error message stating person not found will be shown -
Test case: 'check ' or 'check 11111'
Expected: Invalid command format, error message will be shown
-
Update a PO’s engagement status to free
-
Sets the PO’s isEngaged boolean value to false (so PO is free for dispatch)
-
Prerequisites: Logged in as HQP
-
Test case: 'updatestatus po1' (Assuming PO with such ID exists)
Expected: A success message will be shown -
Test case: 'updatestatus po20'
Expected: No such PO exists, an error message will be shown -
Test case: 'updatestatus ' or 'updatestatus asdf'
Expected: Invalid command format, error message will be shown
-
Check engagement status of all POs
-
Displays all the engagement status of all POs in a list
-
Prerequisites: Logged in as HQP or PO
-
Test case: 'checkstatus'
Expected: List of POs and their engagement statuses
-
Edit a person’s details
-
Edits the details, only selected parameters, of a person. At least one optional parameter has to be filled
-
Prerequisites: Logged in as HQP
-
Test case: 'edit n/s1234567a p/111111 s/xc w/none o/theft
Expected: If person exists, success message is shown, else, error message is shown -
Test case: 'edit n/s1234567a 111111' (or any missing prefix or parameters)
Expected: Invalid command format, person’s details are not edited, error message shown
-
Delete a person
-
Deletes a person from the Police Records
-
Prerequisites: Logged in as HQP
-
Test case: 'Delete s1234567a' (Assuming person with this NRIC exists)
Expected: Success message will be shown -
Test case: 'Delete s1234567a' (If person does not exist)
Expected: Person does not exist, error message is shown -
Test case: 'Delete ' or 'Delete 1111'
Expected: Invalid command format, error message shown
-
Clear
-
Clears the entire Police Records
-
Prerequisites: Logged in as HQP
-
Test case: 'clear'
Expected: Success message is shown === Logout
-
-
Logout from system so that another password can be entered
-
Prerequisite: Logged in as HQP or PO
-
Test case: 'logout'
Expected: Startup screen is shown
-
Autocorrect
-
Autocorrects an input if the input has a similar spelling to other commands
-
Prerequisites: Logged in as HQP or PO
-
Test case: 'lost'
Expected: Message stating if you meant 'list' -
Test case: 'exit'
Expected: Message stating if you meant 'edit'
-
Shutdown
-
Shuts down the system
-
Prerequisites: Logged in as HQP or PO or not at all
-
Test case: 'shutdown'
Expected: System closes
-